
This website is supported by its readers. If you click one of my links I may earn a commission. I am also a participant in the Amazon affiliates programme and I will also earn a commission from qualified purchases.

One of the major problems I had when I invested in my first file cabinet for my home office was that I really struggled with organizing it. This was mainly because the cabinet I bought did not come with rails, meaning I had to come up with creative solutions to help me organize.
Using ring binder folders, buying dividers, organizing your file cabinet by each drawer, and only using larger paper files with cardboard backing are all good options to help use a file cabinet without rails. Purchasing the file cabinet rail inserts separately is also a good alternative.
So which of these alternative methods work best? And what are some good options that you can get file cabinet rail inserts from? Keep reading to find out more!
Now if you’re just interested in my recommendations for the best file cabinets that have the best weight capacity limits you can check them out here (all links take you to Amazon):
- Small cabinet (2 drawers)
- Medium Cabinet (3 drawers)
- Large (4 drawers)
(Just a heads up a lot of people reading my blog are in the process of designing their own home office. If you want to save some of the painstaking time I did in designing my office, you can find my recommended products here)
How to use a file cabinet without rails?
So when I first started working from home a few years back one of my sneaky storage items that helped stop my home office from getting overcrowded was a file cabinet.
The deep drawers and lock made it the perfect storage item to ensure all my sensitive documents stayed safe.
That being said one of the major problems I had was that one of my file cabinets came without rails.
Luckily I found the following solutions to help:
- Use ring binder folders
- Use larger paper files with cardboard backing
- Buy dividers
- Use plastic wallets with labels
- Ore non-paper item
- Build your own rail inserts
- Buy rail inserts
- Buy a file cabinet with rails
Let’s explore these in more detail.
Use ring binder folders
One of the best (and cheapest) solutions to the problem of file cabinets without rails, is to simply invest or use any existing ring binder folders you have laying around your house.
To do this then:
- Fill your ring binder folders with your files – using plastic wallets to keep your papers free from dirt works best in my opinion
- Ensure each ring binder folder is on one topic – I like to break mine down by one folder for my driving and insurance documents, another folder for my tax documents, another folder for my work documents, etc.
- Ensure each ring binder is a different color – this will help you pick them out more easily and be able to navigate through your file cabinet
- Write on the spine your folder – on the spine of your folder, most ring binders have a section for you to add a label or write a note – ensure you do this so you can easily read what each folder is when opening your file cabinet
- Place your ring binder in your file cabinet spine side facing up – this will make it easy to read what each folder is, whilst the girth of the folder should stop any files or folders from slipping.
Now my recommendation for a ring binder would be any cheap ring binder you can find – these Yoobi Ringbinder on Amazon tend to do the job the best for me.
Use larger paper with cardboard backing
For any students reading this post, this option could work for you.
If your file cabinet does not have rails the biggest issue you will have is getting your items to stand upright, especially in vertical file cabinets.
We need to then increase the girth of the individual files we are putting in our cabinets, and I found that the combination of printing your items on larger paper (think A3 instead of A4), and then use glue to stick a cheap piece of cardboard (such as cereal box card) to the back of these papers, will toughen up your files and should make them stand or their own two feet.
To further strengthen this and make them easy to read, I would also recommend putting them in individual plastic wallets.
Just be sure that you only use this method if your paper files have information on one side as the other side will be glued on.
Buy dividers
Probably the option you have already thought of right?
Simply adding dividers in between your files can make the world of difference, regardless of if you have rails or not.
Simply write on the label what that section of files is about and it will make sifting through them a lot easier.
Now don’t get me wrong, doing this with rails will be a lot easier but you can still get the same effect if you ensure that each of your files is as tightly pressed up against each other as possible.
This will ensure that your dividers will stand upright and you can easily sift through your documents.
Use plastic wallets with labels
Similar to using dividers, using everyday plastic wallets and labels can be an easy option to help organize a file cabinet without rails.
Just ensure that the file has a large enough label that makes it easy to read what each individual section says – I found that the Lishine plastic wallets tend to work best for this – link takes you to Amazon.
Again just ensure these items are pushed as tightly against each other as possible to get the best results possible.
Store non-paper items in your railless file cabinet
If you store larger items in your file cabinets then you are supposed to, for example, let’s say you store electric goods in file cabinet drawers use this to your advantage.
Larger items do not need a file cabinet with rails as they can sit freely at the bottom so if you have purchased a cabinet but no longer want to use it for paper files due to lack of rails, consider storing other items in your cabinet
Build your own rail inserts for your file cabinet
If you are desperate for rail inserts for your file cabinet but unable to afford them then you can simply build your own rail inserts.
The job of these file cabinet rail inserts is to contracts your files together making it easy to flip through them – giving you the ability to slide your files across the rail.
All we need to do is mimic two thin long rails that stretch for the depth of your cabinet that you can slide folders off.
I found that unwinding a metal coathanger until it is straight and then cutting this into the appropriate length works best.
Apply glue to either side and stick on the inside of your cabinet and voila – you have a homemade file cabinet.
Buy rail inserts
So if your file cabinet has no rail inserts and you are desperate for them the best option you can do is invest in a pair of portable rail inserts.
Now there are literally millions of them available on the web but for my money, there is no better option than the officemate hanging file frames (link takes you to Amazon).
Not only are they a leading branch name but it comes in a variety of sizes ensuring that you won’t have to worry about getting the wrong size for your cabinet.
Why do some file cabinets come without rails?
Some file cabinets come without rails to save manufacturing costs. The needs of file cabinet rails are usually bespoke to the owner of a file cabinet. If file cabinets were manufactured with rail space for 16 files then it would limit the options for customers looking for a file cabinet with 20 files.
What are file cabinet rails?
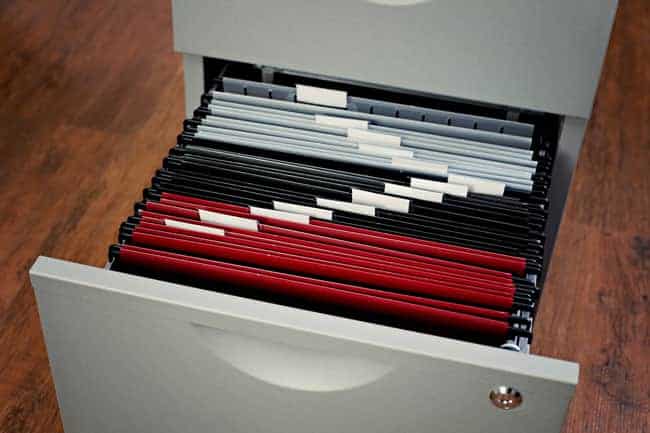
File cabinet rails are an insert device used in file cabinets to compress files together making it easier for users to filter through files. File cabinet rails usually hang in file cabinet drawers with metal columns on either side making it easy to slide files across.
What else should I know about file cabinets?
Luckily, I’ve pulled together some of my recent posts talking all about file cabinets which you can check out below:
- Can you stack file cabinets?
- How deep are file cabinets?
- Why are file cabinets so expensive?
- How heavy is a file cabinet?
- How much weight can a file cabinet hold?
The content on this site has been written by Fehed Nicass who has over a decade worth of experience in sales and has worked remotely for the past 2 years.