
This website is supported by its readers. If you click one of my links I may earn a commission. I am also a participant in the Amazon affiliates programme and I will also earn a commission from qualified purchases.
So working in sales, one of the big things I’ve had to adapt when working from home from my home office has been recording videos. I typically do about 6 or 7 of this per week but doing these from home can prove to be challenging, especially as a lot of our own home offices are no-where near as nice as professional studios. SO how exactly do you record a video in your home office?
Investing in decent lighting. making sure you are in focus and your background is out of focus, creating a script beforehand, rehearsing appropriately, and placing your camera in the correct position are all the best things you can do when recording a video from a home office.
So which of these tips are the most important? And are there any tools that you can invest in to make recording a video in your home office? Keep watching to find out more.
(Just a heads up a lot of people reading my blog are in the process of designing their own home office. If you want to save some of the painstaking time I did in designing my office, you can find my recommended products here)
Make a list of everything you want to cover
So the first thing you’re going to want to do when recording a video from your home office is coming up with the idea you want to cover.
A lot of us think we are naturally gifted in front of the camera ( we’re not) and if this is your first time attempting to record video the first thing you want to do before filming a frame of footage is to set up a solid plan of what your video will cover.
It’s super easy to get overwhelmed when starting to look into this so the best thing is to be specific.
I found then that the best thing to do would be to cover the top 5 things you want to cover in your video. This should mean that you will be going above and beyond in the information you will cover in your video, without having too much information so that whoever watches your video will feel overwhelmed.
Let’s say for example then you are recording a video for a colleague to teach them how to use a new piece of software the five things I would cover would be:
- What is the name of the software?
- What is the main purpose of the software?
- How to use the software
- How using the software will help your employees
- Some bonus features to using the software
Now if like me, you work in sales, and you want to record a video as a way to reach out to prospects your video might want to cover:
- Research that you’ve done on the prospect
- Why exactly you are getting in touch
- How you have helped similar organizations
- What your company does
- A call to action
Making a list then of the five points will ensure you are not overcomplicating or overwhelming the people who will look at your video.
Have a look at what other people have done
A lot of us like to think that we are the first ones to think of doing a video for our topic.
The truth is, if you have thought of the idea, someone else is likely to already have done it.
So why is it important to look at other people’s videos on the topic you want to cover? Personally, I do it for the following reason:
- It can help reassure you that you are covering the right things – a lot of us have impostor syndrome so if you see someone else has covers similar points you were going to cover, it will reassure you that your video will cover the right things
- It can help inspire your decor – a lot of us struggle with our home offices looking stale and bland, looking at other peoples videos can give us decor ideas to make our videos more enjoyable to watch
- It allows us to focus on the niche tips – if everyone video you watch based on your topic covers the same thing you can do something different away from the obvious that will really help the people the video is designed for
- It can help motivate you – a lot of the time we think something is impossible to do until we see someone has already gone before us and achieved it. Recording a video can be pretty nerve-racking but watching other people cover your topic can definitely put your mind at ease
Come up with a video structure
So you have decided what your video will be on and looked fr inspiration by researching other videos out there.
The next step which is super important is structure.
I’ll give you an example, let’s say you watch two videos talking about the same topic that are the same length, and yet one of them engages you for longer than the other.
The big reason for this is all down to structure and so you want to use a technique that holds most people’s attention for longer.
There is a fantastic video that covers how to give an exceptional speech by Nancy Duarte which you can check out below.
In my opinion, there is no better way to structure a video of any length than by doing the following:
- The hook
- The intro
- The Content
- The Bonus
- The close/call to action
Let’s go into these individually.
The hook
The hook is at the start of your video and is where you will get whoever is watching attention – it hooks them in (pun most definitely intended)
A few examples would be;
- Asking someone a question if you are doing a youtube video, (are you interested in why, did you know that x)
- Explaining exactly why the video will be important and why they will pay attention
The Intro
The intro is where you introduce who you are and why you are getting in touch, keep it short, to the point, but also infuse some personality here so people can engage with you.
Studies have found that having more personality in your presentations will cause people to be more focused and pay attention so you definitely want to put yourself in your presentation.
The Content
The content section should be the longest part of your video and should be the section you spend the most amount of time on.
Use the points we talked about earlier around coming up with a list for everything you want to cover and simply place it into your content session.
The Bonus
People love surprises – It’s human nature!
One of the most effective things then you can do with the content in your video would be to add a bonus to give people more than they expected to cover. By going above and beyond will man the people watching your video will definitely leave feeling satisfied.
The close
Finally comes the close.
This step is simple, just make sure you directly ask the people watching the video what you want them to do.
This can be as simple as asking for a call or setting concrete steps.
Either way, just make sure you have one clear point of action you want the person watching your video to take.
Decide on your length
One of the most important aspects of video that too many of us forget about is exactly how long our video should be.
People are bombarded with video content nowadays and most of us begin to lose interest after minutes of watching a video.
As such, if your video is incredibly in-depth, covering a large number of topics, consider breaking these up into more manageable bite-sized sections.
One thing I do when recording my videos is listening to myself back – if I find myself switching off during crucial parts of my video then I know it’s either gone on too long or I need to present the information more clearly and concisely.
Shoot with the cut in mind
If you have ever sat in front of your camera ready to record and thought you would do an excellent job improvising what your video will look like you know exactly how difficult that can be.
The same goes for editing with it taking up the largest amount of time when making your video from your home office.
One of the best things you can do to save you a lot of time would be to plan out your edit before you even start recording.
I like to do this in the following ways:
- Making a list of all the b-roll footage I might need
- Making a list of any images that I need to place
- Getting an idea of what my titles will look like
- Understanding where jokes or humor might be put into the video
- Coming up with a shot list
- Deciding how I will transition from one shot to another
- Come up with a tone
Using all of the above in unison can massively increase how fun your video is to watch.
Let’s break these down briefly:
Making a list of b-roll footage
B-roll can take a mediocre video and scale it up to looking super professional. Like we mentioned people have short attention spans so preparing other footage that is relevant to your video help break things up, keeping your video fresh and people watching for longer
Make a list of images
For a lot of you, you will be recording a video for your colleagues which will often be accompanied by a presentation.
If this is the case, reading off slides can definitely become draining after a while. One of the best things you can do then is to make a list of images that will need to be placed in your video to help emphasize your points.
I love to use gifs and memes which definitely help out with the delivery and emphasis on certain points.
Getting an idea of what my titles will look like
Whilst a lot of us like to do the bare minimum when it comes to titles for our videos and lower thirds, really investing in this can definitely make your video seems a lot more professional.
If you are doing a video for a client consider using their colors in your branding to help with brand resonance.
One thing that works very well is animating your titles, with tons of free options out there like Canva to help with this.
For those of you with a little bit more money to spend consider using Videohive which has tonnes of great titles to use.
Using humor
One of the best bits of advice I’ve received around creating a video is to plan to use humor and jokes to help break up any dense information you have to say and deliver it as though it was off the cuff.
It might feel silly planning out jokes when you record them but doing this in advance will help give a natural flow to your videos.
Come up with a shot list
For a lot of you, this point will be unnecessary, but if your video is on the longer side, takes place in multiple locations, or even if you want to use different angles, one of the best things you can do is come up with a shot list.
If you tick these off as you go along it will make the process of recording really difficult videos a lot easier.
Now whilst you don’t need to storyboard these I think writing a list of the more complicated shots in a notepad can help.
Decide how you will transition between shots
So this is something I learned the hard way.
If you have several takes you need to stitch together in your video, one of the best things you can do is having an idea how you will stitch these together before you start recording.
You’ll find that doing something as simple as zooming in, between shots will flow a lot better than just recording yourself and moving onto the next point.
This works especially well in youtube videos.
Let’s compare the first video I’ve made with one of my more recent ones, you can tell that there is a clear difference between the editing of the two:
To help explain more about the process I take when recording sales videos I’ve made a video which you can check out below:
Come up with a tone
The tone is also an incredibly important thing that a lot of us forget about when recording a video in our home office.
If it is to do something very serious or has to go out to an organization that is more formal – it might not make a lot of sense to send your content out in front of a row of your action figures.
Planning this stuff out in advance and understanding your audience will make planning your video a lot easier. The best thing to do for then is to ask yourself who, when, what, why, and how with your audience and you’ll find that you will identify the best tone for your video on the back of that.
Avoid distractions in your home
So you’re almost set to start recording but the final step is to make sure you have a calm peaceful environment when you do.
This means avoiding distractions which are a lot easier said than done when working from home like a lot of us are.
If you live with pets or have kids I would recommend checking out the following post which talks all about the best way to work from home with distractions;
Now this also goes for the room you will record your video in – this will cover things from keeping your phone away to ensuring you keep your curtains closed.
Human beings will do anything to keep them from doing hard work so keeping distractions away from your home office.
Rehearse your video
I know you’re super keen to get started but an important trick before you start recording is to rehearse out your video in advance.
Doing this will give you an idea of where you are struggling with and will mean you put a lot less pressure on yourself when recording your video.
A trick I learned, that has worked wonders for me is when you are recording your video and you have nailed your take do one more take after that – you’ll find that it will often be your best one.
Set up your camera
So you’ve planned out your content, planned out your edit and now it’s time to finally start recording.
The first thing we need to do then will be to set up our camera – so which camera will work best.
For a lot of you, recording a video on your phone or laptop will be the best option if you are inexperienced with recording on a camera.
That being said I would recommend if you have the money, to invest in a camera.
So what are the different types of cameras you could invest in? I’ve made a table below to explain more:
|
Type of Camera |
Pros |
Cons |
| Phone | The most common options with better video quality than most webcams directly on devices | Poorer camera quality than a lot more professional purpose-build devices |
| Webcam | Easy to use as they record both sound and video together, relatively inexpensive | The video quality is not the best so best for video if using for video in video type content |
| DSLR | The best option for picture quality, tons of accessories to get the exact shot you want | These can be pretty expensive, also the audio function on these is not the best so you will need a microphone. Older cameras don’t have the longest recording times |
| Camcorder | Super easy to use, with mich longer recording time than typical DSLRs | Not a lot of people use camcorders for recording professional video, opting for DSLRs instead, they also typically have video quality the same as most mobile phones |
Now whilst any device can be used for recording video (after all the device you’re most comfortable with is likely to be the one you succeed with the most, in my opinion, the clear winner would have to be investing in a DSLR camera.
For me, there are 3 choices
The Canon M50
The cannon M50 is a few years old now but is one of the most common cameras used by beginners when they want to upgrade from their phones.
It has a fold-out screen so you can see yourself when you are recording and most importantly it is super easy to use – hence why it is one of the best selling cameras on the market for a lot of YouTubers. You can grab it here.
The Sony ZV-1
The Sony ZV-1 has a fantastic product showcase mode which is fantastic if in your video you are trying to demonstrate products. It’s also has a lot more modes to ensure no matter the shot you are looking for this camera will have you covered.
That being said this camera is not as beginner-friendly as the Canon so if you’re unfamiliar with some of the more in-depth aspects of cameras you may want to look for the cannon.
The Black Magic 6k Cinema Camera
So for a lot of you., this camera is going to be a little bit much as it is one of the best cameras on the market that professionals on the market and even beginner filmmakers will use.
That being said if you want to have the best picture quality possible with the most options look no further than the black magic 6k.
This is a fantastic option if you have to do a lot of show photography for things like houses or cars as a part of your role.
Frame your camera shot
So once you have your camera sorted the next step will be to place it and frame yourself effectively.
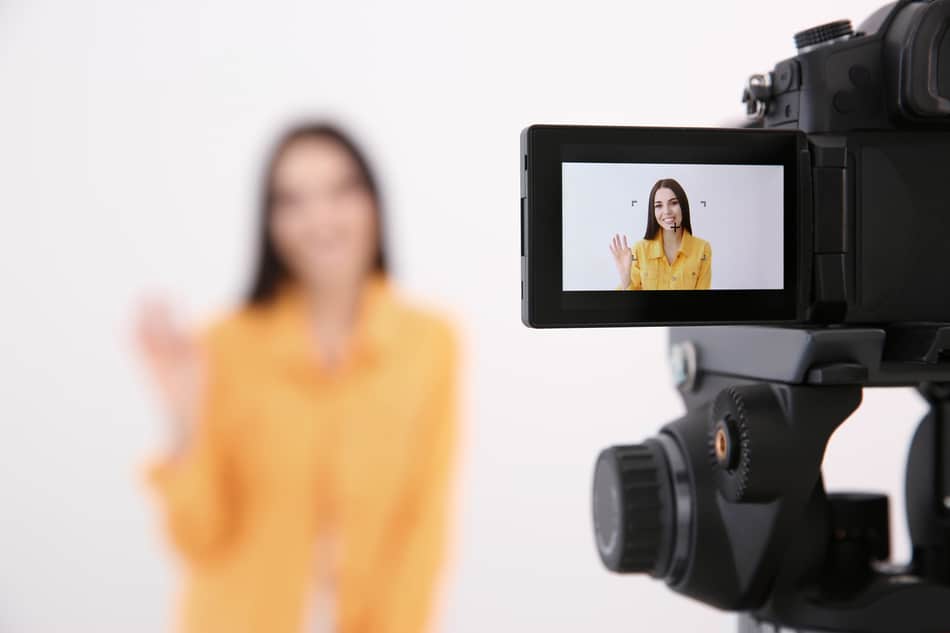
A mistake a lot of us ( myself included) make when it comes to framing is that we leave too much dead space in our shots. If there’s a lot of room lingering around then people’s eyes will naturally be drawn towards it.
You want to leave no more than one foot of space above your head in your shot.
The good news is that most cameras come with framing devices so you know how you look.
Compare the images below to see what would make a bad video vs a good one.


Ensure your battery is charged
The final step before you hit record would be to ensure you have enough batter on the camera you are using.
This is good advice even if you are using a webcam or your phone as the last thing you want to do is be in the flow of recording a video only for it to be pulled apart by a low battery.
Consider lenses
Now for a lot of you, this point will be irrelevant but if your home office workspace is incredibly tight and you don’t have room to move your camera that far back, you might want to invest in adjustable camera lenses.
Especially if you are using DSLR Cameras, these can dramatically alter the composition of your shot.
To help explain more check out the video below:
Ensure you invest in a tripod
The final step to setting your camera will be investing in a tripod.
After all, even if you are using your phone to record your video from your home office, you still need something to hold it to stabilize your shot.
The good news is that most tripods can adjust regardless of what type of camera you are using.
My recommendation would have to be the UBeeesize which will work pretty much for whatever size office you have.
Choose your background
So your camera is set up, it’s time to make sure that our background is up to scratch.
One of the best things you can do to stand out is to have some distance between you and whatever is behind you when you film.
A lot of us live in apartments that we rent so setting up home offices that look like professional studious can be difficult, especially if space is tight.
Taking a few steps forward then and can go a long way.
One trick I learned then to make my video stand out is to invest in LED light which can add some clear separation behind what is behind you.
One thing I would avoid however is any natural light such as windows or doors which might come behind you which can ruin the composition of your shot.
Invest in decent lighting
So we’ve touched upon led lighting behind you to make you stand out but that is just the tip of the iceberg.
To really make your videos stand out, one of the best things you should consider doing is investing in Key lighting.
Anyone who has ever been to a professional photoshoot or heck even taken awkward school pictures knows that you’re blinded by the amount of light on the display and for good reason, most of us live in dark locations.
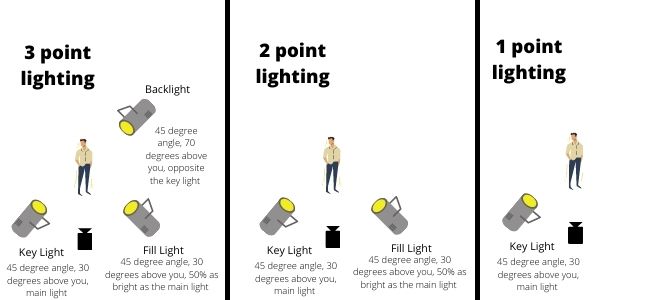
The best thing to do then would be to understand 3 point lighting.
3 point lighting generally means that there will be three points of light on you as you record your video – this is the technique that is deemed as being the most flattering and is commonly used in most Hollywood movies.
The general rule of thumb then is you would typically have one light around 30 degrees above your head at a 45-degree angle – this is often referred to as the key light.
Your second light would also be around 30 degrees above you at another 45-degree angle but is less bright than your key light (anywhere from 30% to 50% less bright)
Finally, your third point of lighting will be the backlight. This is usually 70 degrees above you and opposite the key light.
Now with all that being said if you only have one lamp to try and light you with that can work just as well, just follow the diagram below and you should be good to go.
Once again you can find my recommendations for lighting on my recommended gear page here.
Set up a microphone
So surprisingly, one of the biggest things that most people will remember, regardless of how well-produced your video is, is sound.
As such ensuring that your home office is not only soundproofing for recording but that you have adequate audio input is going to be super important.
This is especially true if you are using a DSLR camera, as their audio inputs definitely leave a lot to be desired.
The best option I think would be to invest in a small lavalier microphone.
While other microphones such as shotgun mics are great for a home office, the truth is the sound quality isn’t that much different.
Lavalier microphones are as simple as plugging in and playing and are super versatile to the point where even if you no longer wish to work from home, these can still be used.
My recommendation then has to be the Diety V-lab which is a fantastic option that makes a noticeable difference in sound quality.
Invest in editing your video
So you’re almost done, the video is in the can, and your happy with the footage you have received but now it’s time for the process that sucks the most in my opinion… Editing.
Remember when we talked about keeping your videos to one minute or less earlier? The reason – Longer video takes longer to edit.
It’s not uncommon for editing your video to sometimes take longer than it does to record.
The good news is that you’ve already done a lot of the hard work in planning.
Now whilst a lot of you will be just fine using free editing tools like I movie there is a lot to be said if your videos are more in-depth and you want to get a professional look.
The two best editing software then on the market place at the moment have to final cut pro for IOS and adobe premiere for Windows devices
Now Final Cut is definitely the easier to use of both and a lot faster however adobe premier has options to take your videos to the next level such as working with adobe after effects.
A few tips that I’ve picked up then when editing video would be the following:
- Record your video in shot clips, this will make sifting through your video content later much easier
- Start editing from the end of your clips as that will be your best take
- Have presets to save on things like adding titles, images, and other sounds you use frequently
Boost your internet signal to upload larger content
One of the major joys of working from home is that a lot of us just can’t match the internet speeds of the offices that we used to work with.
This can prove especially problematic if you are uploading a video to Youtube or trying to share a video over email.
One of the best things you can invest in then when working from home would have to be a Wifi booster, In my experience, the TP-Link is the best option for this which has driven my internet speeds from around 30 MBPS to well over 200 during peak hours.
You can read up more about the TP-Link here.
If you feel as though that your internet speed is not where it should be check out Ookla.com which I regularly use to check my upload and download speed.
Finally, a lot of people reading my blog want to know what products I recommend for a home office/remote working. You can find out my recommendations here and learn how I make money whilst working remotely on the side here.
The content on this site has been written by Fehed Nicass who has over a decade worth of experience in sales and has worked remotely for the past 2 years.